
Migrate Ubuntu Ghost instance to Docker Container using Docker Compose and Docker File
Lately, I've been exploring Docker Containers and decided to transition my instance to one. This simplifies rebuilding and streamlines administration tasks. In this guide, I've utilized Docker Compose and Dockerfile to construct the containers.
My current(existing) ghost configuration
- Ubuntu 22.4
- NGINX
- Systemd
- Node
- Systemd
- MySQL 8
This is the guide I followed: https://ghost.org/docs/install/ubuntu/
Note, that this isn't an official guide so your results may vary. Please backup your ghost instance in the event something breaks.
Create a new directory
First, you want to create a new directory for your files (docker-compose.yml & Dockerfile). These files will be utilized collectively to enable you to redeploy your instance whenever necessary.
e.g.
mkdir phiptech && cd phiptech
Backup your Ghost instance
Backup Ghost Content
Next, you'll want to back up the content for Ghost. Navigate to where you have configured your Ghost installation and type the command below:
ghost backupOnce you have a backup, it should be saved in the backup directory as shown below. Note down this directory for later
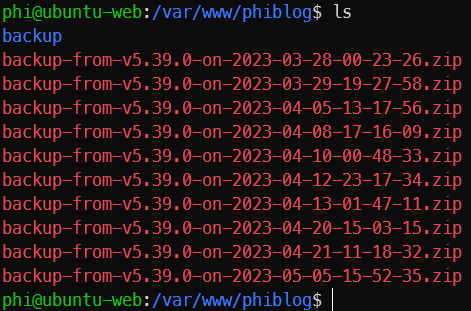
Extract these files to the directory created above. e.g. phiptech/content
Backup Database
The next part of the backup process is to also backup the SQL database. This can be done by taking an SQL dump from the existing SQL database
- Navigate to /home/ghost/mysql (default directory)
- Run command :
sudo mysqldump --all-databases > ~/all_backups.sql
Copy SQL File & Ghost Content Folder
Extract the backup files using the unzip command in the new directory you created above if you haven't already done so
Create SQL Script file called grant_privileges.sql and copy/paste the below. You will need to find the database username that you used initially when you set up ghost. The below script will be used to grant the existing user access to the new SQL instance
CREATE USER 'ghost-658'@'%' IDENTIFIED BY '';
GRANT ALL PRIVILEGES ON phiblog_prod.* TO 'ghost-658'@'%';
Explanation:
CREATE USER 'ghost-658'@'%' IDENTIFIED BY '<yourpassword>';
- This line creates a new MySQL user named
'ghost-658'with a password specified as<yourpassword>. The'%'wildcard in the@'%'part allows this user to connect from any host.
GRANT ALL PRIVILEGES ON phiblog_prod.* TO 'ghost-658'@'%';
- This line grants all privileges (
SELECT,INSERT,UPDATE,DELETE, etc.) on all tables within thephiblog_proddatabase to the user'ghost-658'when connecting from any host ('%'). - The
.*afterphiblog_prodspecifies that the privileges apply to all tables within thephiblog_proddatabase.
Build Docker Compose file
Following this, we'll leverage Docker Compose to instantiate the containers. This approach enables us to define and manage multiple containers, providing a seamless deployment process.
Create the Docker Compose File
version: "3.3"
services:
  ghost:
    image: ghost:latest
    restart: always
    ports:
      - "6060:2368"
    environment:
      url: https://phiptech.com
      database__client: mysql
      database__connection__host: mysql
      database__connection__database: phiblog_prod
      database__connection__user: ghost-658
      database__connection__password: "${MYSQL_PASSWORD}"
      database__connection__port: 3306
    volumes:
      - ghost-data:/var/lib/ghost/content
      - /home/phi/repos/phiptech/content:/var/lib/ghost/backup/content

    command: ["bash", "-c", "cp -r /var/lib/ghost/backup/content/* /var/lib/ghost/content"]

    networks:
      - mynetwork

  mysql:
    build:
      context: .
      dockerfile: Dockerfile
    restart: always
    environment:
      MYSQL_ROOT_PASSWORD: "${MYSQL_ROOT_PASSWORD}"
      MYSQL_DATABASE: phiblog_prod
    networks:
      - mynetwork
    volumes:
    - ghost-db-prod:/var/lib/mysql


networks:
  mynetwork:
    driver: bridge
volumes:
  ghost-data:
  ghost-db-prod:
What you need to edit:
url: Your website URL.ports: Maps ports between the container and the host machine. In this case, it's mapping the port2368from the container to the port6060on the host machine. You can access this viahttp://localhost:6060on your host machine.- `
database values: change as required. "${MYSQL_PASSWORD}": This part uses environment variable substitution. It's pulling the value of an environment variable namedMYSQL_PASSWORDand inserting it into the configuration at this point. So, the password for the database connection will be whatever value is stored in theMYSQL_PASSWORDenvironment variable when the application or service using this configuration file is run. We'll edit the environment variables below."${MYSQL_ROOT_PASSWORD}":same as above- The volume section:
ghost-datathat will be mounted to the/var/lib/ghost/contentdirectory within the container. Volumes are a way to persist data generated by and used by Docker containers. This means you won't lose data when the container is deleted. networks:
mynetwork:
driver: bridge
This section defines a Docker network namedmynetwork.The network is set to use thebridgedriver, which is the default network driver for Docker. This is useful if you want other containers to talk to each other. In this case, the 2 containers will be on the same network so they can communicate.volumes:ghost-data:
ghost-db-prod:- For clarity, we are defining the volumes as we did above, the same with networks. You can leave it as is
/home/phi/repos/phiptech/content:/var/lib/ghost/backup/content
- This line maps the local directory
/home/phi/repos/phiptech/contenton the host machine to the directory/var/lib/ghost/backup/contentinside the Docker container.
command: ["bash", "-c", "cp -r /var/lib/ghost/backup/content/* /var/lib/ghost/content"]
- This specifies the command to run when the container starts. It executes a bash command (
bash -c) within the container. - The command
cp -r /var/lib/ghost/backup/content/* /var/lib/ghost/contentcopies all files and directories from/var/lib/ghost/backup/contentto/var/lib/ghost/contentwithin the container. This is typically used for data migration or initialization tasks, ensuring that the necessary files are in place for the application to function correctly. (This is a once-off task) Please comment this line out when you first start your instance
Create a Docker File for the SQL Container build
# Use the official MySQL image from Docker Hub
FROM mysql:8.0

# Copy the MySQL dump file into the container
COPY all_backups.sql /docker-entrypoint-initdb.d/all_backups.sql

# Expose MySQL port (optional)
EXPOSE 3306

# Copy the SQL script to grant privileges
COPY grant_privileges.sql /docker-entrypoint-initdb.d/

# Set the network mode to bridge
CMD ["mysqld", "--bind-address=0.0.0.0"]
Explanation:
FROM mysql:8.0: Pulls the official MySQL 8.0 image from Docker Hub.
COPY all_backups.sql /docker-entrypoint-initdb.d/all_backups.sql: This copies a SQL dump file named all_backups.sql from the host into the Docker container. This file is backup you created above.
The destination /docker-entrypoint-initdb.d/ is a directory where MySQL automatically executes SQL scripts during container initialization.
EXPOSE 3306: This exposes port 3306, the default port used by MySQL, to allow communication with the MySQL server from other containers or the host system. Note that this does not publish the port to the host machine; it's mainly used for inter-container communication.
COPY grant_privileges.sql /docker-entrypoint-initdb.d/: This instruction copies another SQL script named grant_privileges.sql into the same directory /docker-entrypoint-initdb.d/. This script likely contains SQL commands to grant privileges to MySQL users.
CMD ["mysqld", "--bind-address=0.0.0.0"]: This specifies the command to run when the container starts. Here, it runs the MySQL daemon (mysqld) with the --bind-address=0.0.0.0 option, allowing MySQL to accept connections from any IP address.
Create environments file (.env)
Adjust the password values. These environment variables were previously defined in the docker-compose file. It's a recommended practice, particularly for security reasons, to exclude passwords from git commits. You can extend this practice to other sensitive variables, including database details. For now, let's focus on handling password variables for simplicity.
MYSQL_ROOT_PASSWORD= ""
MYSQL_PASSWORD= ""
Start Docker Container
Before you create the container. Ensure that you aren't using the same ports for the existing ghost instance. You will need to stop the service if you are.
Now that you have all the files required, enter the below command to start the container. This should take a few seconds to start the container
sudo docker-compose up -d
Monitor Docker Container Logs
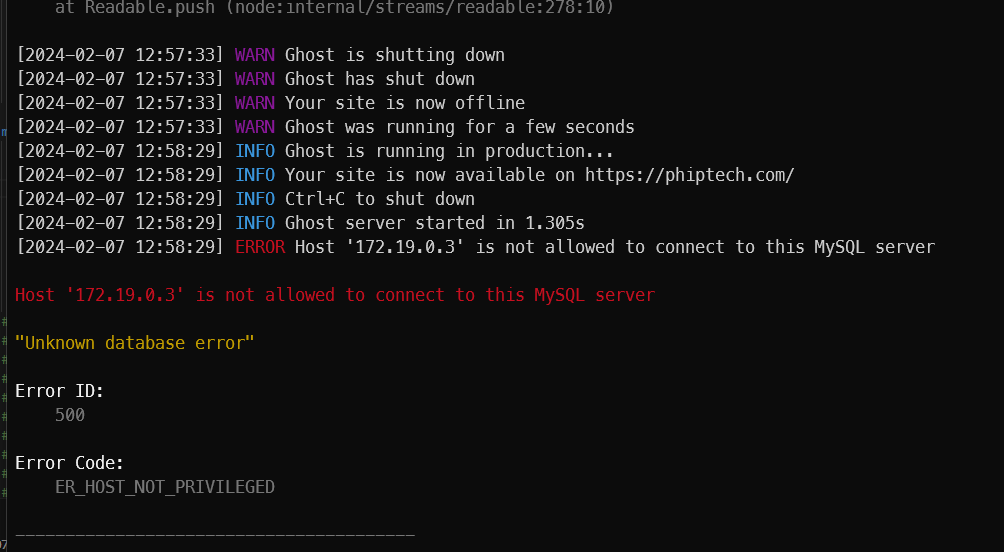
You will need to monitor the logs as you will get errors. I've pasted several images that I received during the process. These are normal errors when it is started. Continue monitoring the logs until the very end
sudo docker logs --follow
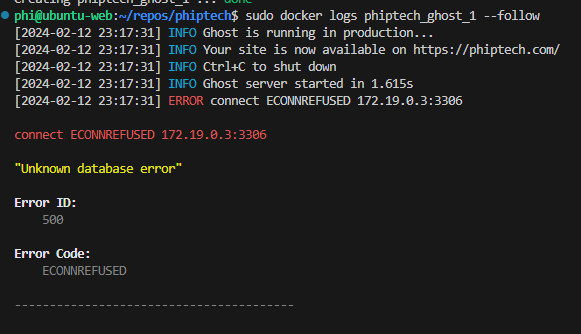

You want to take note of the highlighted red boxes in the below screenshot. This means the SQL script "grant_privileges.sql" and the SQL Back up "all_backups.sql" are running properly. If this does not run, please recheck all files are there.
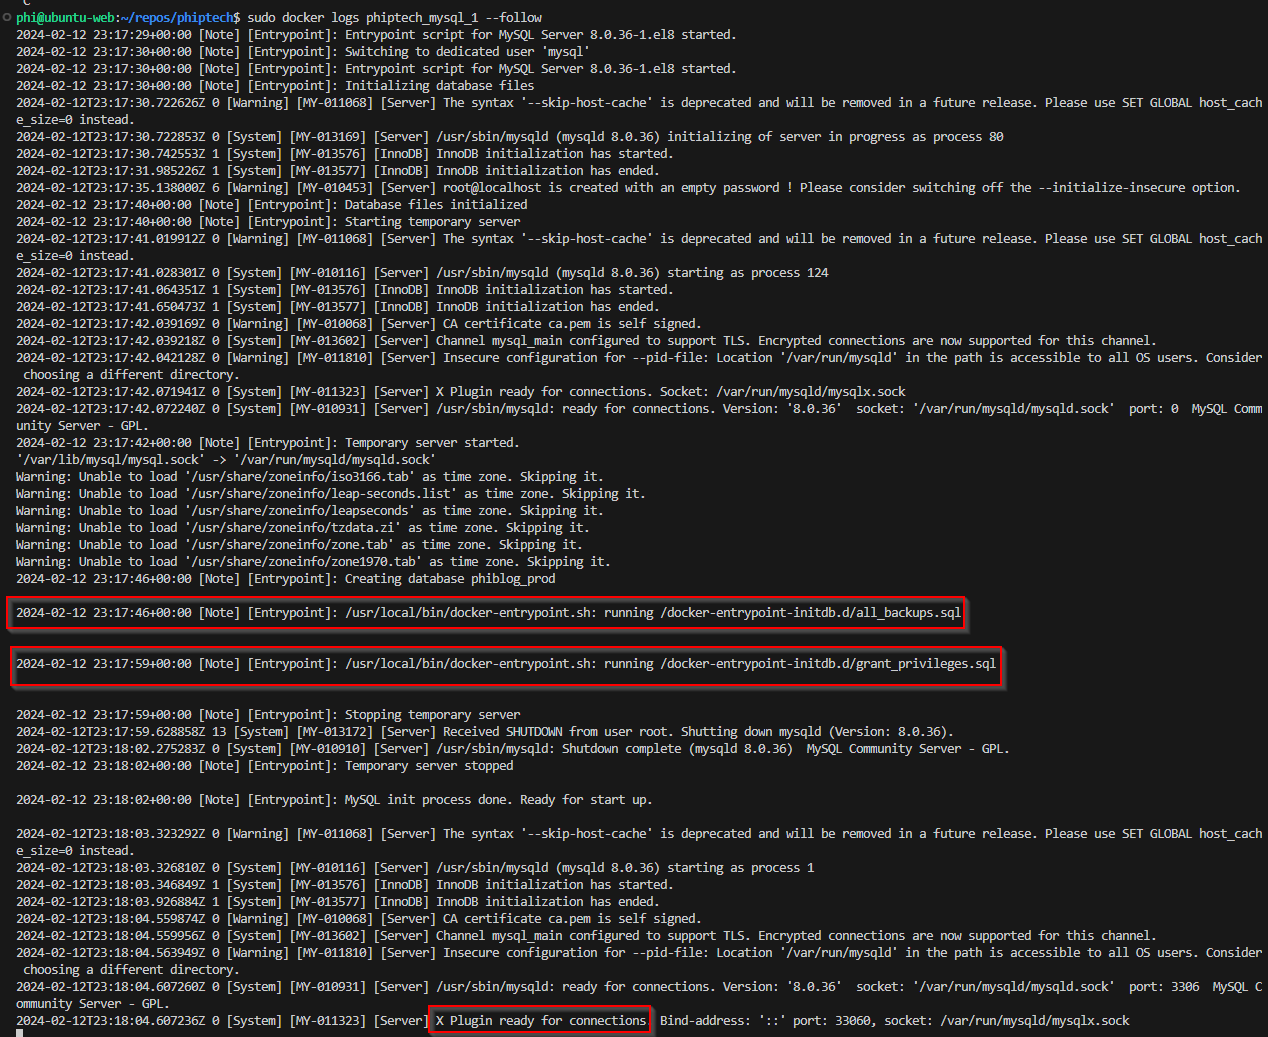
When you see "ready for connections" this means it is now up and running. Navigate to your website to confirm.
And there we have it, you've migrated your ghost instance to containers.
Useful commands
docker ps - List containers on your host
sudo docker-compose down --remove-orphans This command stops and removes containers, networks, volumes, and images created by docker-compose up. Use this command if you want to remove your container
--remove-orphans flag removes containers for services not defined in the Compose file. Orphan containers are those that are not associated with a service in the current Compose file.
sudo docker-compose up -d
- This command rebuilds and starts the containers defined in the
docker-compose.ymlfile in detached mode (-dflag), which means it runs containers in the background. - It recreates the containers if changes have been made to the configuration or if the containers were stopped.
Reset SQL root password
You may want to reset your root password if you have forgotten it like I did, see snippets below for instructions to reset
- Run comamnds
sudo mkdir -p /var/run/mysqld
sudo chown mysql:mysql /var/run/mysqld
sudo mysqld_safe --skip-grant-tables &

- Login SQL
mysql -u root
- Reset password
FLUSH PRIVILEGES;
ALTER USER 'root'@'localhost' IDENTIFIED BY '';


SET PASSWORD FOR 'root'@'localhost' = PASSWORD('');

- Exit safe mode
ps aux | grep mysqld_safe


- Login with new password
mysql -u root -p
- Backup databases
sudo mysqldump --all-databases > ~/all_backups.sql

Useful Links
Understanding Self-Hosted Ghost Data Structure | vkhitrin.com
Updating your Ghost Docker Container to MySQL8 (pointtosource.com)
 docker-library