
How to Set Up Local HTTPS with Custom Certificates Using Nginx Proxy Manager
Suppose you’re running a website locally and want to access it securely over HTTPS. Well, you're in luck. This guide will walk you through setting up a reverse proxy with Nginx Proxy Manager running in Docker on an Ubuntu virtual machine. We’ll create a self-signed SSL certificate so you can enjoy HTTPS on your local network without needing a public domain.
What Is Nginx Proxy Manager?
Nginx Proxy Manager is a free and open-source tool that provides a user-friendly, web-based interface for managing web servers and reverse proxies. With it, you can:
- Easily set up reverse proxy hosts
- Automatically issue SSL certificates via Let’s Encrypt
- Implement access control using HTTP authentication
- Configure URL redirections
Prerequisites
Before you start, make sure you have:
- An Ubuntu virtual machine running (any recent version will do)
- Docker installed on your Ubuntu VM.
- Basic familiarity with the terminal/command line.
- Administrative access on your Windows PC to edit the hosts file.
Create Docker Compose File for Nginx Proxy Manager
Just the following commands to create the folder and file
mkdir -p ~/nginx-proxy-manager
cd ~/nginx-proxy-manager
nano docker-compose.yml
Create the docker-compose file
docker-compose.yml
services:
  npm:
    image: 'jc21/nginx-proxy-manager:latest'
    container_name:
    restart: unless-stopped
    ports:
      - '80:80'
      - '443:443'
      - '81:81'
    environment:
      DB_MYSQL_HOST: "npm-db"
      DB_MYSQL_PORT: 3306
      DB_MYSQL_USER: "npm"
      DB_MYSQL_PASSWORD: "${DB_PASSWORD}"
      DB_MYSQL_NAME: "npm"
    volumes:
      - npm_data:/data
      - npm_letsencrypt:/etc/letsencrypt
    networks:
      - npm-network
    depends_on:
      - npm-db

  npm-db:
    image: 'mariadb:10.5'
    container_name: npm-db
    restart: unless-stopped
    environment:
      MYSQL_ROOT_PASSWORD: '${MYSQL_ROOT_PASSWORD}'
      MYSQL_DATABASE: 'npm'
      MYSQL_USER: 'npm'
      MYSQL_PASSWORD: '${DB_PASSWORD}'
    volumes:
      - npm_db:/var/lib/mysql
    networks:
      - npm-network

volumes:
  npm_data:
  npm_letsencrypt:
  npm_db:

networks:
  npm-network:
    driver: bridge
Don't forget to create the .env for your database file
# MySQL root password
MYSQL_ROOT_PASSWORD=


# Password for 'npm' user
DB_PASSWORD=
Save and exit.
Start Nginx Proxy Manager
Launch Nginx Proxy Manager using:
docker compose up -d

Give it a minute to initialise.
Create a Self-Signed SSL Certificate
Generate the self-signed cert on your Ubuntu VM:
mkdir -p ~/certs
openssl req -x509 -nodes -days 365 -newkey rsa:2048 -keyout ~/certs/selfsigned.key -out ~/certs/selfsigned.crt -subj "/CN=frigate.local"

Upload the Certificate in Nginx Proxy Manager
- Open your browser at:
http://<your-ubuntu-vm-ip>:81 - Admin UI page - Log in (default credentials:
- Email:
[email protected] - Password:
changeme)
- Email:
You'll be prompted to change the password on first logon
- Go to the SSL Certificates tab.
- Click Add SSL Certificate → Custom.

- Name it. I'm using "frigate" as an example
- Upload
~/certs/selfsigned.crtinto Certificate. - Upload
~/certs/selfsigned.keyinto Certificate Key. - Click Save.
Add a Proxy Host
- Navigate to the Proxy Hosts tab.
- Click Add Proxy Host.
- Enter
the domain name you want to useunder Domain Names.

- Set Scheme to
http. - For Forward Hostname / IP, enter
localhost(or your web app IP). - Enter your URL port (e.g., 1984 is the SSL port for go2rtc for mine) in Forward Port.
- Check Block Common Exploits.
- Under the SSL tab:
- Select the
frigate.local self-signedcertificate.
- Select the

- Check Force SSL so it'll redirect to the HTTPS page
- Click Save.
Update Your Hosts File on Windows
To resolve the domain name, in my case (frigate.local) to your local machine, add it to your Windows hosts file:
- Open Notepad as Administrator (right-click → Run as Administrator).
- Open the file:
Edit the file C:\Windows\System32\drivers\etc\hosts
- Add the IP address of your web appat the bottom of the file
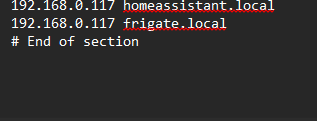
- Save and close the file.
Note this is only local to the machine you're working on and you'll only be able to resolve the hostname locally.
Restart Nginx Proxy Manager (Optional)
If you update configurations or certificates, restart with:
docker compose restart
Access URL Securely
Open your browser and go to your URL. In this case, mine is frigate.local
https://frigate.local
You should see your web page loaded over HTTPS!
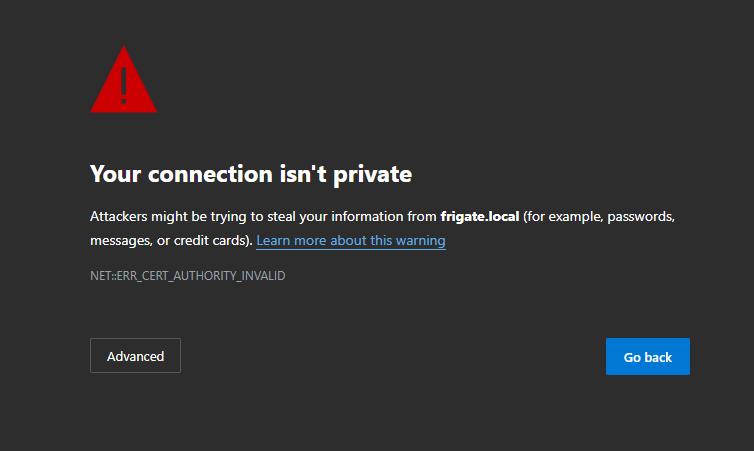
Browser Warning Note
Since this is a self-signed certificate, your browser will warn you that the site isn’t secure. This is expected for local development and safe to bypass.
(Optional) Add Port Forwarding to Access Web App from the Internet
If you want to access website publicly (not just within your local network), you’ll need to:
- Have a Domain name
- Forward Ports on your router:
- Port Forward port
443→ your Ubuntu VM’s IP address on port443.
- Port Forward port
- Secure Your Setup:
- Use a real domain name with a trusted SSL certificate via Let’s Encrypt.
- Ensure your Ubuntu VM has a firewall (e.g., UFW) configured properly.
- Consider enabling IP whitelisting or authentication in website or Nginx Proxy Manager.
- Point a Domain Name (e.g.,
frigate.yourdomain.com) to your public IP if you want a proper HTTPS certificate from Let’s Encrypt.
Found this article useful? Why not buy Phi a coffee to show your appreciation?